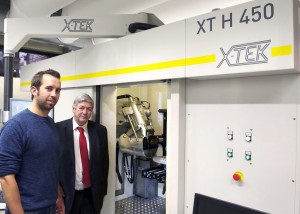
Nikon Metrology CT machines used for geometrical accuracy research by University of Leuven

Photo by Nikon Metrology Europe NV
Many components and assemblies have internal features that are difficult to inspect nondestructively, as conventional metrology requires them to be sectioned. Examples are a hollow hydroformed camshaft, a 3D printed mould with conformal cooling channels, or a plastic injection moulded electrical connector with metal inserts. Now, the PMA division of Leuven’s university is using X-ray Computed Tomography (CT) machines to research measuring the interiors of such components in 3D.
CT has been widely used for many years in medicine for imaging and diagnosis, and to inspect materials to identify the presence of internal features, such as unwanted inclusions in a casting. Now, research is being carried out by Prof Jean-Pierre Kruth and his team at the University of Leuven, the oldest and largest university in Belgium, to broaden the application of CT into the field of dimensional metrology.
With CT, components can be inspected externally, as traditionally done with a touch probe or laser scanner, but internal geometry can also be measured non-destructively in the same set-up.
The university, called Katholieke Universiteit Leuven or KU Leuven, is close to the European headquarters of Nikon Metrology. The two organisations are collaborating closely in the development of CT as a tool for geometrical measuring and quality control. Two Nikon Metrology CT machines were recently installed at KU Leuven, enabling Prof Kruth’s PMA division, which is responsible for production engineering, machine design and automation within the university’s department of mechanical engineering, to carry out in-depth research.
CT machines are also used in the metallurgy department at the Leuven university, mainly for materials examination. This department has recently upgraded one its CT machines with a new Nikon Metrology 180 keV X-ray source and control software.
One of the PMA division’s X-ray machines, a 225 keV model XT H 225, includes a microfocus X-ray source, linear scales, better cooling and other enhancements that provide increased accuracy, making it suitable for CT metrology. The second machine is a large cabinet microfocus XT H 450, the highest power CT machine currently installed in Belgium and the Netherlands, providing sufficient X-ray penetration for thicker metal parts to be inspected. As a guide, 450 keV microfocus source can penetrate 35 mm of steel or 110 mm of aluminium.
The Hercules Foundation in Brussels, established by the Flemish Government to offer funding for scientific research, provided a grant to help the university purchase the machines. Prerequisites for receiving the money were that the equipment had to be unique in the area and that it be made available for research by other companies and institutions.
Conventionally machined parts measured as well as 3D printed components

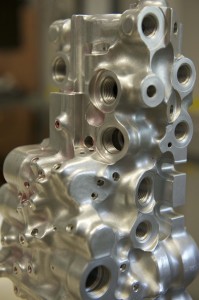
CT is an ideal tool to inspect a servo valve with
complex internal channels
Photo by Nikon Metrology Europe NV
Prof Kruth commented, “Our PMA division has a long tradition in production research, starting in the 1960s with milling, drilling and grinding, progressing through spark erosion in the 70s and implementing additive manufacturing (AM) and 3D printing techniques in the 1990s.
“Dimensional metrology and quality control for components produced using the earlier machining techniques resulted in our installing coordinate measuring machines (CMMs) with touch probes and laser scanning heads.
Today, production techniques including five-axis milling, additive manufacturing and hydroforming make it possible to produce complex products, often with internal features or channels.
Such complex products presented us with a challenge, as it is impossible to non-destructively inspect the internal features without X-raying the parts.
Often, one-off prototypes or small batches of components are produced. Sectioning even one component to inspect it conventionally would result in an unacceptable scrap level in percentage terms.
CT presents its own difficulties, however, as metal in particular is dense and the X-rays tend to scatter and be absorbed unless the power is high. Moreover, the standard machine platforms are not developed with sufficient rigidity and accuracy for precision measuring, as they are traditionally used for material inspection.
“In fact there is a general lack of understanding within the CT community regarding the accuracy and repeatability problems associated with using the technology for measurement and traceability of the results.”
To research the possibilities of using CT for metrology, KU Leuven enlisted the help of two partners, local engineering college, Group T, led by Prof Wim Dewulf, and the DeNayer Institute in nearby Sint-Katelijne-Waver, which merged with the university on 1st October 2013.
Three groups of components were targeted – additive manufactured parts, conventionally produced precision components and assemblies, and highly complex parts also produced by traditional machining, such as a servo valve that goes into the F16 fighter jet and the Ariane rocket.
<
As an example the valve has hundreds of intersecting channels whose dimensions need to be measured and there is also a need to check for internal burrs where holes meet, a job that would be difficult without destructively testing the part. Clearly 100% inspection, which is demanded for many such safety-critical parts, is an impossibility without some form of non-destructive testing.
CT measuring accuracy rivals that of conventional metrology

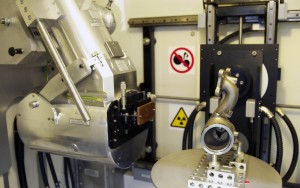
The XT H 450 X-ray source is suited to scan small castings to gain an insight into the inner details of the part.
Photo by Nikon Metrology Europe NV
Initial results from using X-ray CT to measure these parts have proved very promising, according to Prof Kruth. Research carried out at the PMA laboratory indicated that – for some metallic components and depending on the application-, measuring uncertainty (maximum permissible error) both internally and for outer dimensions of the part can be below 10 microns using the Nikon Metrology CT system. This means, its accuracy lies close to that of a typical coordinate measuring machine. For example, one of the CMMs in the laboratory has an uncertainty of 5 microns plus 5 microns per metre of component length.
To help achieve this level of CT scanning precision, the team at PMA houses its two Nikon Metrology machines in a temperature controlled environment, despite each machine having its own internal cooling system for maintaining thermal stability.
In operation, a source produces X-rays by projecting electrons onto a target. As X-rays penetrate the workpiece, they are attenuated due to absorption and scattering. The amount of attenuation is determined by the distance travelled into the material and by its composition and density (i.e. attenuation coefficient), as well as by the energy level (keV) of the X-rays. After penetrating the workpiece, the attenuated X-rays are typically captured by means of a flat panel detector, resulting in a 2D grayscale image. 2D images are taken for many rotation steps of the workpiece.

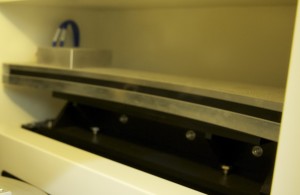
The curved linear diode array detector (CLDA) optimizes the collection of X-rays by eliminating scatter phenomena that typically corrupt 2D radiographs of blades and other metal parts.
Photo by Nikon Metrology Europe NV
Reconstruction of an industrial component based on the projected image slices, analogous to layers in a 3D printed component, leads to a voxel model (a voxel is the 3D analogue of a pixel), where the grey value of the voxels is a measure of the linear attenuation coëfficiënt of the material. The big advantage of CT is that it eliminates the superimposition of structural images outside the area of interest. The voxel data is post-processed using algorithms to detect the edges and features of the workpiece, allowing dimensional measurement and quality control.
The XT H 450 installed in PMA’s laboratory also features a 1D curved linear detector in addition to a conventional 2D flat panel detector. Using the linear detector requires the workpiece to be shifted along the rotational axis in order to measure successive cross-sections of the object in a similar way as medical CT scanners. Research is currently being carried out at PMA to determine whether the linear detector, which allows higher power (higher voltage, current or exposure time and hence larger material penetration) and is less sensitive to X-ray scatter, can be used to inspect large components more accurately than with a flat panel detector.
Technical challenges
Various issues are being investigated by Prof. Kruth and his staff, such as optimizing the X-ray illumination parameters and adjusting the grey level thresholding parameters for traceable dimensional measurements, lowering the X-ray spot size for greater accuracy and increasing the power of the X-ray source for greater penetration into large metallic components.
Another research topic is beam hardening, a common problem with a polychromatic CT source whereby lower energy photons are more easily absorbed by the workpiece material. It results in chromatic aberration and deformation of the image, mainly at the edges, causing an erroneous grey value to be detected which gives the impression that the skin of the component is of a different material from the core and implies wrong edge detection. Beam hardening is undesirable when studying material composition and is corrected by beam filtration and software, but for metrology, consideration is being given to harnessing the effect to increase edge definition, making it easier to measure the outside dimensions of the workpiece more accurately.
Collaboration
The close relationship between KU Leuven and Nikon Metrology, which originated from a former company spun off from the university to commercialise its work, was celebrated recently by the inauguration of the PMA’s CT facilities by Kenji Yoshikawa, CEO of Nikon Metrology. Other university spin-off enterprises, like LayerWise, which specialises in metal additive manufacturing, and Materialise, a world player in rapid prototyping, are today working with the university on how to apply metrology CT to inspect complex parts produced by additive manufacturing.. It is indicative that Prof Kruth was a founding board member of all three companies.
These are just a few of a large number of collaborative affiliations that PMA has with companies and academe internationally, mainly at a European level but also in the US and Japan. Research activities are very much driven by industry and are thus of a practical nature.
A recent European-wide metrology CT collaboration involved 15 companies and Laboratories across Europe measuring the same objects and comparing results, sharing knowledge and best practice in metrology with a view to optimising accuracy and traceability of measurements.
Another European co-operation has just started with the help of a grant from the European Union Marie-Curie programme. KU Leuven has joined Nikon Metrology, the NPL (National Physical Laboratory – the UK’s national measurement institute), the PTB (Physikalisch-Technische Bundesanstalt – Germany’s national metrology institute), Materialise in Belgium and a number of other companies and universities in the training of engineers and researchers in CT metrology.
For more information, please visit http://www.nikonmetrology.com.
News Categories
- » NEWS HOME
- » Automation & Robotics
- » Industry 4.0
- » Material Handling
- » Sensors
- » Quality & Testing
- » Machine Vision
- » Laser & Optics
- » Metalworking
- » Motion Control & Drives
- » Hydraulics & Pneumatics
- » Process Industry
- » Renewable Energy
- » Agriculture
- » Home & Office Furniture
- » Additive Manufacturing
- » Environmental Tech

